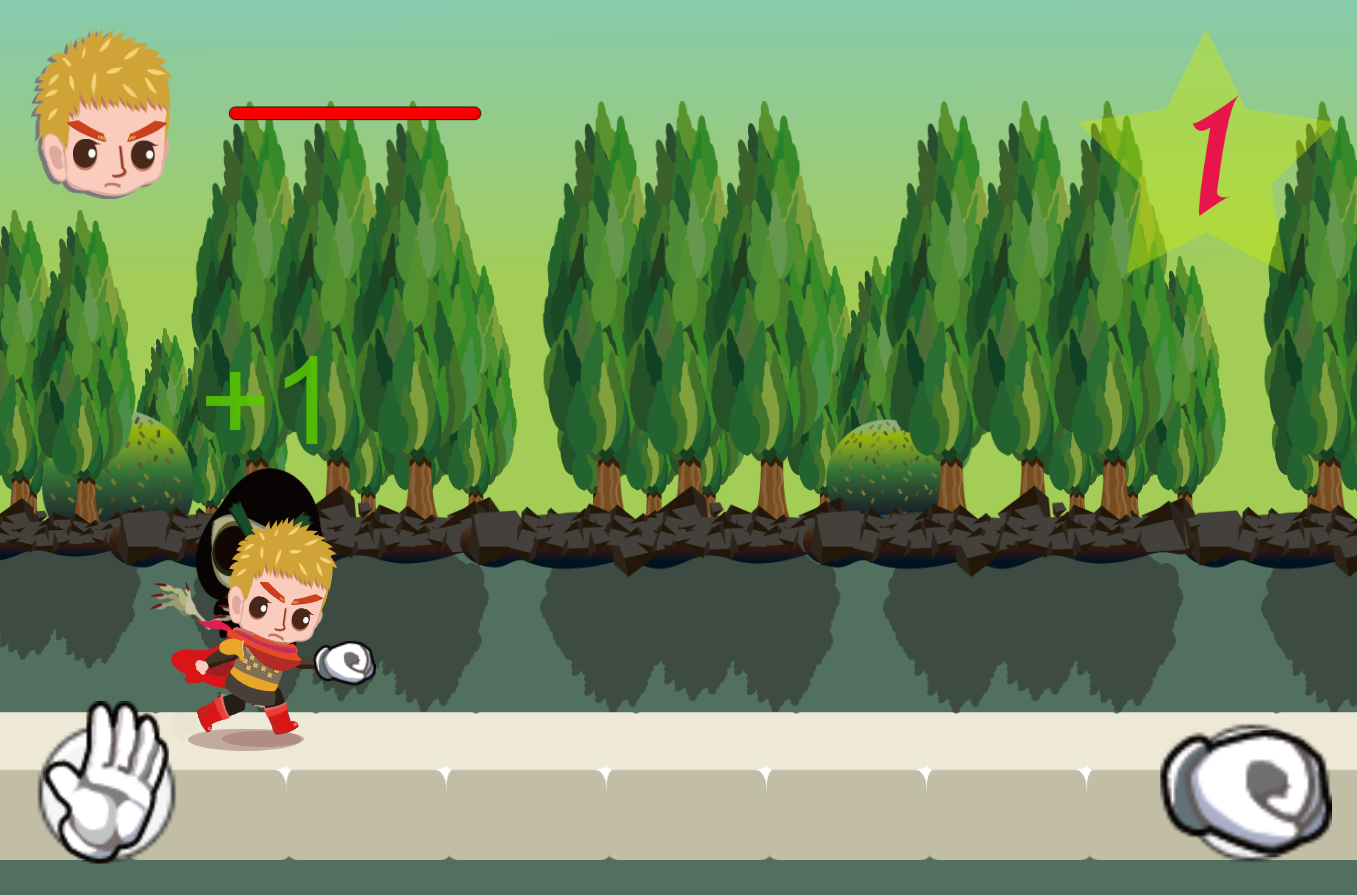
This is "High Five Knight", a small idea me and my girlfriend attempted to put together.
It's still in progress, although we do not have much time to work on it, especially her as she provides all the art and she is very busy doing other things.
So I though I would put it here as it might never get released :)
It's a very simple infinite runner, designed for mobile devices. The main character keeps running and comes across NPCs of 2 types, he has to high five the "friendly" ones and punch the foes. And of course, jumping over gaps.
For this project I created all the animations, using the mecanim system, wrote all the scripts and all the shaders. The game is optimized for mobiles, all the spawning objects are written with object pooling and all the shaders are as efficient as possible. The only light processed is ambient light and I used a Stencil buffer for the main character shadow so it only renders on the ground tiles.
I had to spend a lot of time with the profiler to understand how to obtain the best frame rate and how to speed the game up, eventually I managed to get it to run the best I could.
There is no music but you will hear sound effects.
I hope to find to time to finish it one day. Nonetheless, it is a fun little project that I am happy to leave here on the blog as a good example of a simple mobile game.
Here are some screenshots:
The APK file is downloadable here
Tuesday, 31 May 2016
Thursday, 5 May 2016
Inventory system
This is something I wanted to do for a while and now I finally got some time to.
Here you will find an example for an inventory system, that kind of inventory where you place items in slots, some of which are stackable and can be place multiple times in a single slot.
Once again, this is not the most efficient code, but it is a good starting point to improve upon. For this project I used this great asset.
Before I post any code, this is what the inventory will look like:
The item "apple" is stackable, which is why it is possible to place multiple of them in one slot. The shield and the sword are not, therefore they will always take one slot for each of them.
For our purpose we only need to worry about the InventoryItem public gameobject. This is the representation of the item in the inventory, in form of UI component.
Now, create 3 prefabs (you can empty game objects) called Apple, Shield, Sword. These are supposed to be the intractable objects the player will see in the game. We won't need them for this example, but we will use these objects as items of the player's inventory.
The player's inventory is nothing but a single script, which I won't show you here because it only consists of a List of Item. Make the List public so we can easily access it and populate it.
This list will be used as a "database" for the items, which we will read and translate to a UI inventory.
Attach the PlayerInventory script to an empty object in the hierarchy.
Now, let's focus on the slots for a moment. When the player hover the mouse over the slot, this will change color to red, to signal that the slot is being selected. This will also assign the slot's transform to a Transform type variable in the inventory script, which we haven;t seen yet. This is simply used to keep track of the selected slots.
This is the Slot script, attached to the Slot UI object:
OnPointerEnter and OnPointerExit are used to detect when the mouse pointer is over the slot. When it happens, we update the transform variable in the InventoryUIController script, which we'll see soon and we change the color of the SlotChild image.
The CountChild() method on line 35 is used to count all the children of the SlotChild object, to see how many items are in the slot itself. Any time an item is dragged into a slot, it's made a child of it.
The method on line 48 is pretty self explanatory, and the GetChildReady() is used to grab the reference of the SlotChild.
Let's have a look now at the InventoryUIController script, which is attached to the Inventory UI object in the canvas:
The overSlot Transform variable is the one we saw earlier in the Slot script, which containts a reference to the slot that is being selected.
After getting all the reference needed in the Start method, I proceed by creating the grid of slot in the canvas. I instantiate multiple copies of the Slot prefab, set the as children of he Inventory object and add them to a List of Slot.
When it comes to populate the slots, we iterate inside the PlayerInventory list of items and instantiate the inventoryItem gameobject which you have see on on line 3 in the Item script. This will create the UI element for the item, which is then set as a child of the Inventory canvas object and drop in the slot. We'll see this method in just a moment. Finally, the method on line 57 simply returs the first empty slot available.
Now, the last script: InventoryItem. Before we see it, we need to create the prefab.For each item we need to make a UI representation of it. Simply create an Image in the canvas, and let's called it AppleInv. Attach the InventoryItem script to it and choose the "apple" sprite image. This is the inspector for this object:
Save this as a prefab and do the same thing for shield and sword, and remember to change the image.
This is the script:
Let's start from the OnDrag method. This is an overridden method used to detect when the UI element is being dragged around. When it happens, we keep updating its position to match the mpuse pointer position, so as to get a dragging effect. We also set its parent to the Inventory object, so it is no longer a child of the slot it was contained in and, finally, we call the CountChild method of the containing slot, so it can update the text.
When the object is being dragged we need to set the raycastTarget variable to false (line 33). This is done so when the UI element of the item is being moved around, we can raycast through it. This is necessary as we need to detect the slot with the mouse pointer and we won;t be able to do it if the item that we are dragging blocks the raycast.
When we stop dragging, OnEndDrag(), we reset this variable to true and we call the CheckSlotAndDrop(...) method.
For this method we pass the transform variable in the InventoryUIController, which should contain the transform of the slot selected, passed by the Slot itself with the method OnPointerEnter, as we saw earlier.
If the slot is empty or if its is populated by an item of type stackable and we are dragging one with the same name, we place the item in it. The dropping, which happens in the method DropInSlot(...), is done by parenting the item to the slot transform. Also, when this happens, we update the label parameter of the slot by making it equal to the item's name. This is used to avoid different items populating the same slot. Here we also call the Count/Child method of the slot, so we can update the text which represents the number of items in one slot.
If the condition on line 47 is not met, it means that we are trying to place a non-stackable item in a slot that is not empty and contains an item of the same type. Basically, place a sword in a slot that already contains a sword. Or, we are dropping the item outside of a slot. If that's the case, we want to place the item back where we got it from. So, we simply drop it in the lastSlot slot, which is a reference to the last slot that was the parent to this item, which it was first assigned when the InventoryUIController populated all the slots. Also, during this process, it will happen that the item swill not have a slot parent first, as they are just being place in the slots for the first time. So, when it happens (line 52), we place these items in the first empty slot available, so as to populate them all correctly.
All this is probably very confusing, but I can assure you it works. To try it out, here an example scene of the project.
Here you will find an example for an inventory system, that kind of inventory where you place items in slots, some of which are stackable and can be place multiple times in a single slot.
Once again, this is not the most efficient code, but it is a good starting point to improve upon. For this project I used this great asset.
Before I post any code, this is what the inventory will look like:
![]() |
| Fig 1 |
To begin with, create a Canvas, then create a Panel and remane it Inventory and also change its tag to InventoryUI. As a child of the canvas, create an empty element call Slot. Then again, place 2 objects as siblings children of this slo object, one is an Image called SlotChild, and the other one is a Text, which you do not need to rename it. For the SlotChild image, use the "f" sprite of the downloaded asset.
This is the hierarchy:
![]() |
| Fig 2 |
The way I imagined it, we would have an Item script which will serve as a base class for all items in the game. A variable of this script is going to be an object with the script InventoryItem attached to it, which is a prefab of the UI element used to represent the item itself in the inventory.
This is the Item script:
1 2 3 4 5 6 7 8 9 10 11 12 13 14 15 16 17 | public class Item : MonoBehaviour { public GameObject inventoryItem; public string name; public bool stackable; // Use this for initialization void Start () { } // Update is called once per frame void Update () { } } |
For our purpose we only need to worry about the InventoryItem public gameobject. This is the representation of the item in the inventory, in form of UI component.
Now, create 3 prefabs (you can empty game objects) called Apple, Shield, Sword. These are supposed to be the intractable objects the player will see in the game. We won't need them for this example, but we will use these objects as items of the player's inventory.
The player's inventory is nothing but a single script, which I won't show you here because it only consists of a List of Item. Make the List public so we can easily access it and populate it.
This list will be used as a "database" for the items, which we will read and translate to a UI inventory.
Attach the PlayerInventory script to an empty object in the hierarchy.
Now, let's focus on the slots for a moment. When the player hover the mouse over the slot, this will change color to red, to signal that the slot is being selected. This will also assign the slot's transform to a Transform type variable in the inventory script, which we haven;t seen yet. This is simply used to keep track of the selected slots.
This is the Slot script, attached to the Slot UI object:
1 2 3 4 5 6 7 8 9 10 11 12 13 14 15 16 17 18 19 20 21 22 23 24 25 26 27 28 29 30 31 32 33 34 35 36 37 38 39 40 41 42 43 44 45 46 47 48 49 50 51 52 53 54 55 56 57 58 | public class Slot : MonoBehaviour, IPointerEnterHandler, IPointerExitHandler { public int quantity; public string label; InventoryUIController inv; Image myImage; Text quantityText; public GameObject slotchild; // Use this for initialization void Awake () { inv = GameObject.FindGameObjectWithTag("InventoryUI").GetComponent<InventoryUIController> (); myImage = GetComponentInChildren < Image> (); // SlotChild image quantityText =GetComponentInChildren<Text> (); quantityText.text = ""; } public void OnPointerEnter (PointerEventData eventData) { myImage.color = Color.red; inv.overSlot = slotchild.transform; } public void OnPointerExit (PointerEventData eventData) { myImage.color = Color.white; inv.overSlot = null; } public void CountChild() { int num = slotchild.transform.childCount; if (num >= 2) quantityText.text = num.ToString (); else quantityText.text = ""; if (isSloEmpty ()) label = ""; } public bool isSloEmpty() { return slotchild.transform.childCount == 0; } public void GetChildReady() { slotchild = transform.GetChild(0).gameObject; } } |
OnPointerEnter and OnPointerExit are used to detect when the mouse pointer is over the slot. When it happens, we update the transform variable in the InventoryUIController script, which we'll see soon and we change the color of the SlotChild image.
The CountChild() method on line 35 is used to count all the children of the SlotChild object, to see how many items are in the slot itself. Any time an item is dragged into a slot, it's made a child of it.
The method on line 48 is pretty self explanatory, and the GetChildReady() is used to grab the reference of the SlotChild.
Let's have a look now at the InventoryUIController script, which is attached to the Inventory UI object in the canvas:
1 2 3 4 5 6 7 8 9 10 11 12 13 14 15 16 17 18 19 20 21 22 23 24 25 26 27 28 29 30 31 32 33 34 35 36 37 38 39 40 41 42 43 44 45 46 47 48 49 50 51 52 53 54 55 56 57 58 59 60 61 62 63 64 65 66 67 68 69 70 71 | public class InventoryUIController : MonoBehaviour { public Transform overSlot; public GameObject slotPrefab; [HideInInspector] public List<GameObject> allSlots; Vector2 grid; RectTransform rect; PlayerInventory playerInventory; // Use this for initialization void Start () { grid = new Vector2 (4, 4); rect = GetComponent<RectTransform> (); allSlots = new List<GameObject> (); playerInventory = GameObject.FindGameObjectWithTag ("Player").GetComponent<PlayerInventory> (); for (int x = 0; x < 4; x++) { for (int y = 0; y < 4; y++) { GameObject slot = Instantiate (slotPrefab) as GameObject; slot.gameObject.name = "Slot_" + x + "_" + y; slot.GetComponent<RectTransform> ().SetParent (rect); float posx = (rect.sizeDelta.x/5) * (x+1); float posy = -(rect.sizeDelta.y / 5) * (y + 1); Vector3 pos = new Vector3(posx, posy,0); slot.GetComponent<RectTransform> ().anchoredPosition= pos; slot.GetComponent<Slot> ().GetChildReady (); allSlots.Add (slot); } } PopulateInvenory (); } void PopulateInvenory() { foreach (Item it in playerInventory.inventory) { GameObject invItem = Instantiate (it.inventoryItem) as GameObject; invItem.transform.SetParent (this.gameObject.transform); invItem.GetComponent<InventoryItem> ().CheckSlotAndDrop (allSlots[0].GetComponent<Slot>().slotchild.transform); } } public GameObject GetFirstEmptySlot() { GameObject obj = null; foreach (GameObject g in allSlots) { if (g.GetComponent<Slot> ().isSloEmpty ()) { obj = g.GetComponent<Slot> ().slotchild.gameObject; break; } } return obj; } } |
The overSlot Transform variable is the one we saw earlier in the Slot script, which containts a reference to the slot that is being selected.
After getting all the reference needed in the Start method, I proceed by creating the grid of slot in the canvas. I instantiate multiple copies of the Slot prefab, set the as children of he Inventory object and add them to a List of Slot.
When it comes to populate the slots, we iterate inside the PlayerInventory list of items and instantiate the inventoryItem gameobject which you have see on on line 3 in the Item script. This will create the UI element for the item, which is then set as a child of the Inventory canvas object and drop in the slot. We'll see this method in just a moment. Finally, the method on line 57 simply returs the first empty slot available.
Now, the last script: InventoryItem. Before we see it, we need to create the prefab.For each item we need to make a UI representation of it. Simply create an Image in the canvas, and let's called it AppleInv. Attach the InventoryItem script to it and choose the "apple" sprite image. This is the inspector for this object:
![]() |
| Fig 3 |
This is the script:
1 2 3 4 5 6 7 8 9 10 11 12 13 14 15 16 17 18 19 20 21 22 23 24 25 26 27 28 29 30 31 32 33 34 35 36 37 38 39 40 41 42 43 44 45 46 47 48 49 50 51 52 53 54 55 56 57 58 59 60 61 62 63 64 65 66 67 | public class InventoryItem : MonoBehaviour, IDragHandler, IBeginDragHandler, IEndDragHandler{ public bool stackable; public string name; Image im; InventoryUIController inv; RectTransform rect; Transform lastSlot; // Use this for initialization void Awake () { im = GetComponent<Image> (); inv = GameObject.FindGameObjectWithTag("InventoryUI").GetComponent<InventoryUIController> (); rect = GetComponent<RectTransform> (); } public void OnDrag (PointerEventData eventData) { rect.position = Input.mousePosition; rect.SetParent (inv.transform); if(lastSlot!=null) lastSlot.GetComponentInParent<Slot> ().CountChild (); } public void OnBeginDrag (PointerEventData eventData) { im.raycastTarget = false; } public void OnEndDrag (PointerEventData eventData) { im.raycastTarget = true; CheckSlotAndDrop (inv.overSlot); } public void CheckSlotAndDrop(Transform slot) { if (slot != null && slot.GetComponentInParent<Slot> ().isSloEmpty () || slot != null && slot.GetComponentInParent<Slot> ().label == name && stackable) DropInSlot (slot); else if (lastSlot != null) DropInSlot (lastSlot); else DropInSlot (inv.GetFirstEmptySlot ().transform); } public void DropInSlot(Transform s) { Debug.Log ("Dropping in " + s.gameObject.name); if(rect==null) Debug.Log ("NULLLL"); rect.SetParent (s); lastSlot = s; s.GetComponentInParent<Slot> ().CountChild (); s.GetComponentInParent<Slot> ().label = name; rect.anchoredPosition = Vector3.zero; } } |
Let's start from the OnDrag method. This is an overridden method used to detect when the UI element is being dragged around. When it happens, we keep updating its position to match the mpuse pointer position, so as to get a dragging effect. We also set its parent to the Inventory object, so it is no longer a child of the slot it was contained in and, finally, we call the CountChild method of the containing slot, so it can update the text.
When the object is being dragged we need to set the raycastTarget variable to false (line 33). This is done so when the UI element of the item is being moved around, we can raycast through it. This is necessary as we need to detect the slot with the mouse pointer and we won;t be able to do it if the item that we are dragging blocks the raycast.
When we stop dragging, OnEndDrag(), we reset this variable to true and we call the CheckSlotAndDrop(...) method.
For this method we pass the transform variable in the InventoryUIController, which should contain the transform of the slot selected, passed by the Slot itself with the method OnPointerEnter, as we saw earlier.
If the slot is empty or if its is populated by an item of type stackable and we are dragging one with the same name, we place the item in it. The dropping, which happens in the method DropInSlot(...), is done by parenting the item to the slot transform. Also, when this happens, we update the label parameter of the slot by making it equal to the item's name. This is used to avoid different items populating the same slot. Here we also call the Count/Child method of the slot, so we can update the text which represents the number of items in one slot.
If the condition on line 47 is not met, it means that we are trying to place a non-stackable item in a slot that is not empty and contains an item of the same type. Basically, place a sword in a slot that already contains a sword. Or, we are dropping the item outside of a slot. If that's the case, we want to place the item back where we got it from. So, we simply drop it in the lastSlot slot, which is a reference to the last slot that was the parent to this item, which it was first assigned when the InventoryUIController populated all the slots. Also, during this process, it will happen that the item swill not have a slot parent first, as they are just being place in the slots for the first time. So, when it happens (line 52), we place these items in the first empty slot available, so as to populate them all correctly.
All this is probably very confusing, but I can assure you it works. To try it out, here an example scene of the project.
Friday, 15 April 2016
Diffuse shader: vertex / fragment shader
In this example, I will show yo how we can write a shader to achieve the same effect as the previous shader we wrote (light diffuse), only this time with a vertex/fragment shader.
Here, we will have to compute light manually and color each pixel properly according to the light detected.
Please bear in mind that this particular type of shader will only work with a single, directional light, it will not react to multiple lights, ambient light or even single lights which are not of type directional. We will see later, in other posts, how to add multiple lights and ambient light.
This is the shader code:
I assume you are now familiar with how to begin a shader program, so I will skip the first few lines of code.
On line 10 we add the tag "ForwardBase". This is necessary as it tells Unity that we are in forward rendering and dealing with main directional light.
In the input structure we have one additional parameter, called norm with the semantic NORMAL. This will take the vertex normal vector from the object.
On line 36 we declare a variable called _LightColor0. This is a built in Unity variable that represents the main directional light color property. If you have more directional lights while using this shader, one will override the other one, according to rotation and intensity, the lights will not blend together.
On line 43, we convert the normal vector from the input to a "world position" vector, which is then normalized in the fragment shader on line 52. On the next line, we normalize the direction vector of the directional light, using another built in Unity variable, _WorldSpaceLightPos0.
With these 2 normalized vectors we can calculate the light attenuation, which is what happens on line 55. We first perform a dot product between the 2 vectors.
A dot product of normalized vectors return a value between -1 and 1, depending on the direction they are pointing to: if they point to the same direction, the value returned is 1, if one points to the complete opposite direction of the other one, the value is -1.This value is used to represent the intensity of the light intensity.
Then, we clamp the value obtained between the value itself (which is maximum 1) and 0, using the max method you see being used on the same line. This is done because we don't want any negative contribution, in other words, the light intensity simply cannot be a negative value.
Finally, we multiply this intensity value for the color of the light, represented by the variable _LightColor0.
At the end of the method we return the light variable, "casted" to a float 4 as we want to returna color. The value of 1 added is the alpha value. This is then multiplied by the _Color public parameter, which is the used defined color, to give a tint to the object.
This is the result:
As you may have noticed, writing vertex/fragment shaders require a lot more code comparing to the surface shader, however, we are allowed much greater flexibility and we can create more complex effects.
Here, we will have to compute light manually and color each pixel properly according to the light detected.
Please bear in mind that this particular type of shader will only work with a single, directional light, it will not react to multiple lights, ambient light or even single lights which are not of type directional. We will see later, in other posts, how to add multiple lights and ambient light.
This is the shader code:
1 2 3 4 5 6 7 8 9 10 11 12 13 14 15 16 17 18 19 20 21 22 23 24 25 26 27 28 29 30 31 32 33 34 35 36 37 38 39 40 41 42 43 44 45 46 47 48 49 50 51 52 53 54 55 56 57 58 59 60 61 62 63 64 65 66 67 68 69 | Shader "Custom/DiffuseSingleLight" { Properties { _Color("Color",Color) = (1,1,1,1) } Subshader { Tags{"LightMode" = "ForwardBase"} Pass { CGPROGRAM #pragma vertex vert #pragma fragment frag struct input { float4 ver : POSITION; float3 norm : NORMAL; }; struct v2f { float4 pos : POSITION; float3 norm : NORMAL; }; float4 _Color; float3 _LightColor0; //is a built in variable but must be declared! v2f vert(input i) { v2f o; o.pos = mul(UNITY_MATRIX_MVP,i.ver); o.norm = mul(float4(i.norm,0.0),_World2Object).xyz; //_World2Object is float4 return o; } float4 frag(v2f v) : COLOR { float3 normDirection = normalize(v.norm); float3 lightDirection = normalize(_WorldSpaceLightPos0); float3 light = max(0.0,dot(normDirection,lightDirection)) * _LightColor0.rgb; return float4(light,1) * _Color; } ENDCG } } } |
I assume you are now familiar with how to begin a shader program, so I will skip the first few lines of code.
On line 10 we add the tag "ForwardBase". This is necessary as it tells Unity that we are in forward rendering and dealing with main directional light.
In the input structure we have one additional parameter, called norm with the semantic NORMAL. This will take the vertex normal vector from the object.
On line 36 we declare a variable called _LightColor0. This is a built in Unity variable that represents the main directional light color property. If you have more directional lights while using this shader, one will override the other one, according to rotation and intensity, the lights will not blend together.
On line 43, we convert the normal vector from the input to a "world position" vector, which is then normalized in the fragment shader on line 52. On the next line, we normalize the direction vector of the directional light, using another built in Unity variable, _WorldSpaceLightPos0.
With these 2 normalized vectors we can calculate the light attenuation, which is what happens on line 55. We first perform a dot product between the 2 vectors.
A dot product of normalized vectors return a value between -1 and 1, depending on the direction they are pointing to: if they point to the same direction, the value returned is 1, if one points to the complete opposite direction of the other one, the value is -1.This value is used to represent the intensity of the light intensity.
Then, we clamp the value obtained between the value itself (which is maximum 1) and 0, using the max method you see being used on the same line. This is done because we don't want any negative contribution, in other words, the light intensity simply cannot be a negative value.
Finally, we multiply this intensity value for the color of the light, represented by the variable _LightColor0.
At the end of the method we return the light variable, "casted" to a float 4 as we want to returna color. The value of 1 added is the alpha value. This is then multiplied by the _Color public parameter, which is the used defined color, to give a tint to the object.
This is the result:
As you may have noticed, writing vertex/fragment shaders require a lot more code comparing to the surface shader, however, we are allowed much greater flexibility and we can create more complex effects.
Sunday, 10 April 2016
Diffuse shader: surface shader
In this post I will show you how to create a diffuse shader (which reacts to lighting) using surface shaders.
This tells Unity to lok for a function called surf and to use the pre-built lighing model Lambert. It is possible to add additional parameters here, for example, to enable alpha blend.
Then the method itself will have to be declared as such:
The structure Input is defined by you. Here we will have all the input variables that are needed to achieve whatever effect we trying to create in the shader. We can use some in_built variables to get some information about our model, like world normals ecc. A complete list is of course available on the Unity website (link here).
The SurfaceOutput structure is already pre-built in Unity, and so are its parameters. We can use its variables to set the output of our shaders. Some examples are Albedo, which determines the diffuse color, or Alpha, used for transparency.
Now, this is the complete code used to create a diffuse shader:
Just like a vertex/fragment shader, we start with the keyword Shader, followed by the name. This is ShaderLab, so the syntax is exactly the same. The main difference is in the CG part of the program.
On line 16 we tell the engine where to look for our surface method, and we are usnig the Lambert lighting model.
The structure Input contains only a variable float4 called col. Actually, this variable is not even used, as we are going to output the color the is passed in by the user in the properties. It is necessary to put a variable inside the structure though, otherwise we will get en error.
In our surf method, on line 22, we simply set the Albedo member (the diffuse color) of the SurfaceOutput structure (predefined) to be equal to the _Color public variable.
To sum up, all we are doing here is taking the _Color variable, which is the color selected by the user, and pass it to the SurfaceOutput.Albedo variable, which is a predetermined variable that set the diffuse color of the model.
As you can see, the code is very simple and we can avoid to deal with vertex and fragment methods, which are automatically generated for us behind the scenes.
If we create a material with this shader and attach it to a sphere, this is the result:
Surface shaders are intended to simplify the code for creating complex shaders. These type of shaders will then create automatically vertex and fragment functions and we do not need to deal with them.
I will then show you how to do a diffuse shader using vertex and fragment methods, like we did for the unlit shader in the previous post.
Surface shaders are structured differently than vertex/fragment shaders and, in particular, they have some parameteres that are required: a surface function, which is the CG written method that deals with the surface shader and a lighting model. Unity provides pre-made lighting models that can be used in the shader, however, it is possible to create custom ones as well.
Just like in vertex/fragment shaders, we point to the surface method with the #pragma directive, just like so:
1 | #pragma surface surf Lambert : optional_parameters
|
This tells Unity to lok for a function called surf and to use the pre-built lighing model Lambert. It is possible to add additional parameters here, for example, to enable alpha blend.
Then the method itself will have to be declared as such:
1 2 | void surf(Input in, inout SurfaceOutput o) {} |
The structure Input is defined by you. Here we will have all the input variables that are needed to achieve whatever effect we trying to create in the shader. We can use some in_built variables to get some information about our model, like world normals ecc. A complete list is of course available on the Unity website (link here).
The SurfaceOutput structure is already pre-built in Unity, and so are its parameters. We can use its variables to set the output of our shaders. Some examples are Albedo, which determines the diffuse color, or Alpha, used for transparency.
Now, this is the complete code used to create a diffuse shader:
1 2 3 4 5 6 7 8 9 10 11 12 13 14 15 16 17 18 19 20 21 22 23 24 25 26 27 28 29 30 | Shader "Custom/SingleColorSurfaceShader" { Properties { _Color("Tint",Color) = (1,1,1,1) } SubShader { CGPROGRAM #pragma surface surf Lambert float4 _Color; fixed _Transparency; struct Input { float4 col : COLOR; }; void surf (Input IN, inout SurfaceOutput o) { o.Albedo = _Color.rgb; } ENDCG } } |
Just like a vertex/fragment shader, we start with the keyword Shader, followed by the name. This is ShaderLab, so the syntax is exactly the same. The main difference is in the CG part of the program.
On line 16 we tell the engine where to look for our surface method, and we are usnig the Lambert lighting model.
The structure Input contains only a variable float4 called col. Actually, this variable is not even used, as we are going to output the color the is passed in by the user in the properties. It is necessary to put a variable inside the structure though, otherwise we will get en error.
In our surf method, on line 22, we simply set the Albedo member (the diffuse color) of the SurfaceOutput structure (predefined) to be equal to the _Color public variable.
To sum up, all we are doing here is taking the _Color variable, which is the color selected by the user, and pass it to the SurfaceOutput.Albedo variable, which is a predetermined variable that set the diffuse color of the model.
As you can see, the code is very simple and we can avoid to deal with vertex and fragment methods, which are automatically generated for us behind the scenes.
If we create a material with this shader and attach it to a sphere, this is the result:
Monday, 4 April 2016
Custom Unlit Shader
Shaders are both fascinating and frustrating.
Writing shaders is very rewarding, however, it can lead you to total madness.
I already showed you how to write shaders which use the Stencil buffer; now I want demonstrate how to create a shader from the ground up in Unity.
I should probably point out that I am not a shader expert, but I do find the topic extremely interesting and Unity has a lot of functionality that makes writing shaders easier.
In this tutorial we will write the simplest of the shaders, one that does not compute lights or textures but simply returns a single color. Also, the shader we are going to write is a so called "vertex/fragment" shader.
Unity has its own language for writing these programs, called ShaderLab. Other languages are also used, and one that we are going to be looking at is CG, which stands for C for Graphics, a shader language developed by Nvidia. The shaders we write are a mix of these 2 languages.
To begin with, right click in the project folder, select Create -> Shader -> UnlitShader. It doesn't really matter which options of shader you choose as we are going to completely delete the whole content.
I'm going to post the code below and I will then explain the details.
when we write a shader we start with the keyword Shader, followed by the name. The name itself can be put after "/" so it will appear in subfolders when we select it in the material. (Fig 1).
Then we create some proprierties. These variables are public and can be tweaked from the inspector in the shader submenu. The only variable we have is called _Color. Within the brackets, we first pass the name with which the variable will be displayed (in this case, "Tint") and we then pass it the type, which is of type Color. When passing this type, in the inspector we will have the option to choose the color we want to have using the palette. (Fig 2).
Now, on line 8, we start the Subshader. The subshader is, well, the shader itself. You can have as many as you need, and usually they perform differently and are written for different platforms. The graphics card will read each subshader you write and use the first one that is compatible with its system.
Right after that, we have the Pass keyword. A pass is basically a draw call. For this simple example, a single pass is enough for what we want to achieve. Some other cases require multiple passes, like the stencil buffer I mentioned earlier or if we want to use multiple lights.
With the CGPROGRAM statement we are now telling Unity that we are going to write in CG. This will end at line 49, with the ENDCG instruction.
If you remember, earlier i mentioned that we are going to write a vertex/fragment shader. This means that this program will contain a function called fragment, and one called vertex.
It is common practice to use frag and vert as names for these 2 functions. On lines 15 and 16 we tell Unity where to look for these 2 functions and what names they have: the vertex method is called vert and the fragment method is called frag.
Before I continue, let's explain what these 2 methods do. It's actually pretty simple to understand: the vertex program is the portion of code that runs for each vertex of the mesh, so you can use it to create animations or special effects like curved worlds. The fragment function runs for each pixel, so it is used to color our mesh and render textures.
The next thing we see is a struct called input. Here we basically grab all the information we need forom "outside". By that I mean we pass in all the variables regarding our model that needs to be processed like, in this case, the vertex position pos, of type float4, which is basically a Vector 4 of floats. The POSITION keyword you see written after is called a semantic, and it's used to communicate to the gpu what kind of variable this is. This variable is pretty much required for every shader we write as it is used to display the actual mesh that is going to run this particular shader.
The next struct called v2f also contains a float4 variable called pos, but the semantic is different. This is because we are going to take the vertex position from the input struct, which is a local position, and convert it into clip space position (with semantic SV_POSITION), which is basically a bunch of coordinates that Unity understands.
On line 32 I declare a float4 type variable called _Color. As you may have noticed this is the same name we gave to the Color type variable in the Proprieties section. This is done because as we are now writing in CG, this portion of code is not aware of what happend outside of it. So, we need a reference to the _Color parameter we declared earlier in the program. To do so, we simply re declare it in the CG section of our shader program using the same name. The type float4 is commonly used for colors as RGBA.
We finally got to the vertex method. This method is of type v2f with the struct input passed in.
In the method, we first declare a v2f object, called o.
The code on line 38 is something you will see in every shader: this does what I explained earlier, takes the local position of the vertex of the mesh and converts them into clip space so the model can be rendered in the scene. This is done by multiplying the pos variable of the input struct to the UNITY_MATRIX_MVP, which I believe it stands for model view projection. Remember, this is a matrix, so the order in which you multiply the 2 parameters matters.
You can try doing mul(i.pos,UNITY_MATRIX_MVP) for fun, see what happens.
Lastly, we return the object o.
Finally, the fragment method.
This is of type float4, to represent a color, as its semantic suggests.
All we do here is to return the _Color value, which is nothing but the color we will pick in the inspector. So, every single pixel used by this mesh will be colored as dictated by the _Color variable.
Now you can just create a capsule or sphere, anything really, create then a new material, select this shader and attach it to the 3D object and see the result.
With white color, looks like this
Writing shaders is very rewarding, however, it can lead you to total madness.
I already showed you how to write shaders which use the Stencil buffer; now I want demonstrate how to create a shader from the ground up in Unity.
I should probably point out that I am not a shader expert, but I do find the topic extremely interesting and Unity has a lot of functionality that makes writing shaders easier.
In this tutorial we will write the simplest of the shaders, one that does not compute lights or textures but simply returns a single color. Also, the shader we are going to write is a so called "vertex/fragment" shader.
Unity has its own language for writing these programs, called ShaderLab. Other languages are also used, and one that we are going to be looking at is CG, which stands for C for Graphics, a shader language developed by Nvidia. The shaders we write are a mix of these 2 languages.
To begin with, right click in the project folder, select Create -> Shader -> UnlitShader. It doesn't really matter which options of shader you choose as we are going to completely delete the whole content.
I'm going to post the code below and I will then explain the details.
1 2 3 4 5 6 7 8 9 10 11 12 13 14 15 16 17 18 19 20 21 22 23 24 25 26 27 28 29 30 31 32 33 34 35 36 37 38 39 40 41 42 43 44 45 46 47 48 49 50 51 52 53 | Shader "Custom/UnlitSingleColor" { Properties { _Color("Tint",Color) = (1,1,1,1) } Subshader { Pass { CGPROGRAM #pragma vertex vert #pragma fragment frag struct input { float4 pos : POSITION; }; struct v2f { float4 pos : SV_POSITION; }; float4 _Color; v2f vert(input i) { v2f o; o.pos = mul(UNITY_MATRIX_MVP,i.pos); //unity_matrix_mvp goes first. these are matrices, orders in multiplications matters return o; } float4 frag(v2f i) : COLOR { return _Color; } ENDCG } } |
when we write a shader we start with the keyword Shader, followed by the name. The name itself can be put after "/" so it will appear in subfolders when we select it in the material. (Fig 1).
![]() |
| Fig 1 |
![]() |
| Fig 2 |
Right after that, we have the Pass keyword. A pass is basically a draw call. For this simple example, a single pass is enough for what we want to achieve. Some other cases require multiple passes, like the stencil buffer I mentioned earlier or if we want to use multiple lights.
With the CGPROGRAM statement we are now telling Unity that we are going to write in CG. This will end at line 49, with the ENDCG instruction.
If you remember, earlier i mentioned that we are going to write a vertex/fragment shader. This means that this program will contain a function called fragment, and one called vertex.
It is common practice to use frag and vert as names for these 2 functions. On lines 15 and 16 we tell Unity where to look for these 2 functions and what names they have: the vertex method is called vert and the fragment method is called frag.
Before I continue, let's explain what these 2 methods do. It's actually pretty simple to understand: the vertex program is the portion of code that runs for each vertex of the mesh, so you can use it to create animations or special effects like curved worlds. The fragment function runs for each pixel, so it is used to color our mesh and render textures.
The next thing we see is a struct called input. Here we basically grab all the information we need forom "outside". By that I mean we pass in all the variables regarding our model that needs to be processed like, in this case, the vertex position pos, of type float4, which is basically a Vector 4 of floats. The POSITION keyword you see written after is called a semantic, and it's used to communicate to the gpu what kind of variable this is. This variable is pretty much required for every shader we write as it is used to display the actual mesh that is going to run this particular shader.
The next struct called v2f also contains a float4 variable called pos, but the semantic is different. This is because we are going to take the vertex position from the input struct, which is a local position, and convert it into clip space position (with semantic SV_POSITION), which is basically a bunch of coordinates that Unity understands.
On line 32 I declare a float4 type variable called _Color. As you may have noticed this is the same name we gave to the Color type variable in the Proprieties section. This is done because as we are now writing in CG, this portion of code is not aware of what happend outside of it. So, we need a reference to the _Color parameter we declared earlier in the program. To do so, we simply re declare it in the CG section of our shader program using the same name. The type float4 is commonly used for colors as RGBA.
We finally got to the vertex method. This method is of type v2f with the struct input passed in.
In the method, we first declare a v2f object, called o.
The code on line 38 is something you will see in every shader: this does what I explained earlier, takes the local position of the vertex of the mesh and converts them into clip space so the model can be rendered in the scene. This is done by multiplying the pos variable of the input struct to the UNITY_MATRIX_MVP, which I believe it stands for model view projection. Remember, this is a matrix, so the order in which you multiply the 2 parameters matters.
You can try doing mul(i.pos,UNITY_MATRIX_MVP) for fun, see what happens.
Lastly, we return the object o.
Finally, the fragment method.
This is of type float4, to represent a color, as its semantic suggests.
All we do here is to return the _Color value, which is nothing but the color we will pick in the inspector. So, every single pixel used by this mesh will be colored as dictated by the _Color variable.
Now you can just create a capsule or sphere, anything really, create then a new material, select this shader and attach it to the 3D object and see the result.
With white color, looks like this
Wednesday, 23 March 2016
Object pooling in Unity
When playing games, accessing the memory is one of those things that slows your game down dramatically. Although this might not be much of an issue if you are running a game on the latest computer, it will most certainly become a problem on mobile devices.
This happens when objects are created (instantiated) and destroyed repeatedly during runtime. These usually are recyclable objects, like projectiles, disposable enemies or even background objects, which are continuously destroyed and recreated.
Object pooling is a technique that helps avoiding this problem. By instantiating in the scene all the enemies we need, for example, we can simply activate them a few at the times when we need them. Then, when they need to be removed from the scene, because let's say, they have been killed, we deactivate them, so they are no longer present, but still available for use later on. This way, we only interact with the memory only once, at the beginning, and leave the objects in the scene and simply activate them whenever is necessary.
In this quick and short tutorial, we see how we can code object pooling. In this example, we will be shooting projectiles from the camera. We will create all the objects first and call them when it is time to shoot.
For our projectile, just create a Sphere, set the collider to isTrigger and give it a Rigidbody, with no gravity.
This is the script for the projectile, called, shockingly, Projectile:
The coroutine will simply deactivate the object after 5 seconds and it is started any time the object is activated, causing the OnEnable() method to be called. During the Update(), all I do is to move the object along the Z axis.
Attach the script to the Sphere just created and save the object as a prefab.
Now, the Shooting script:
The public GameObject on line 2 is our projectile prefab which we'll assign in the inspector
Then, we create the array of GameObjects and also an empty GameObject which simply act as a parent for all projectiles, so they don't mess up the hierarchy.
In the Start() method, we initialize the parent object as well as the array. Then , we proceed to fill it up. With the for loop, we instantiate multiple copies of the prefab, put each one of them into the array, set their parent to the parent object and set them as inactive in the hierarchy. This way, they won't be "physically present" in the scene.When you run the scene, your hierarchy should look like this:
All the projectiles are now in the scene and waiting to be used.
In the Update(), we simply detect any mouse click so we can call the Shoot() function when it happens.
When it is time to shoot, we iterate inside the array of projectiles, looking for a non active one (line 34). When found, we set its position to the current position, which in this case is the camera position, and then we simply activate it, so the game object will now move as dictated by its Projectile script.
Remember, after 5 seconds the projectile object will be deactivated, which means it will be available to be shot again..
It is important to remember that by using this technique we need to assign the right number of objects to be instantiated. For example if we expect to be able to shoot more than 50 objects at the time, we need to create a larger array. If all the projectiles in the array are active, we simply wouldn't be able to shoot anymore as we need a non active one in order to do so.
This happens when objects are created (instantiated) and destroyed repeatedly during runtime. These usually are recyclable objects, like projectiles, disposable enemies or even background objects, which are continuously destroyed and recreated.
Object pooling is a technique that helps avoiding this problem. By instantiating in the scene all the enemies we need, for example, we can simply activate them a few at the times when we need them. Then, when they need to be removed from the scene, because let's say, they have been killed, we deactivate them, so they are no longer present, but still available for use later on. This way, we only interact with the memory only once, at the beginning, and leave the objects in the scene and simply activate them whenever is necessary.
In this quick and short tutorial, we see how we can code object pooling. In this example, we will be shooting projectiles from the camera. We will create all the objects first and call them when it is time to shoot.
For our projectile, just create a Sphere, set the collider to isTrigger and give it a Rigidbody, with no gravity.
This is the script for the projectile, called, shockingly, Projectile:
1 2 3 4 5 6 7 8 9 10 11 12 13 14 15 16 17 18 19 20 21 22 23 | public class Projectile : MonoBehaviour { public float speed; void OnEnable () { StartCoroutine (die ()); } void Update () { transform.position += new Vector3 (0, 0, speed * Time.deltaTime); } IEnumerator die() { yield return new WaitForSeconds (5); gameObject.SetActive (false); } } |
The coroutine will simply deactivate the object after 5 seconds and it is started any time the object is activated, causing the OnEnable() method to be called. During the Update(), all I do is to move the object along the Z axis.
Attach the script to the Sphere just created and save the object as a prefab.
Now, the Shooting script:
1 2 3 4 5 6 7 8 9 10 11 12 13 14 15 16 17 18 19 20 21 22 23 24 25 26 27 28 29 30 31 32 33 34 35 36 37 38 39 40 41 42 | public class Shooting : MonoBehaviour { public GameObject projectilePrefab; GameObject[] allProjectiles; GameObject projectilesParent; void Start () { projectilesParent = new GameObject ("ProjectilesParent"); allProjectiles = new GameObject[50]; for (int i = 0; i < allProjectiles.Length; i++) { GameObject obj = Instantiate (projectilePrefab, transform.position, Quaternion.identity) as GameObject; allProjectiles [i] = obj; obj.transform.SetParent (projectilesParent.transform); obj.SetActive (false); } } void Update() { if (Input.GetMouseButtonDown (0)) Shoot (); } void Shoot() { for (int i = 0; i < allProjectiles.Length; i++) { if (!allProjectiles [i].activeInHierarchy) { allProjectiles [i].transform.position = transform.position; allProjectiles [i].SetActive (true); break; } } } } |
The public GameObject on line 2 is our projectile prefab which we'll assign in the inspector
Then, we create the array of GameObjects and also an empty GameObject which simply act as a parent for all projectiles, so they don't mess up the hierarchy.
In the Start() method, we initialize the parent object as well as the array. Then , we proceed to fill it up. With the for loop, we instantiate multiple copies of the prefab, put each one of them into the array, set their parent to the parent object and set them as inactive in the hierarchy. This way, they won't be "physically present" in the scene.When you run the scene, your hierarchy should look like this:
![]() |
In the Update(), we simply detect any mouse click so we can call the Shoot() function when it happens.
When it is time to shoot, we iterate inside the array of projectiles, looking for a non active one (line 34). When found, we set its position to the current position, which in this case is the camera position, and then we simply activate it, so the game object will now move as dictated by its Projectile script.
Remember, after 5 seconds the projectile object will be deactivated, which means it will be available to be shot again..
It is important to remember that by using this technique we need to assign the right number of objects to be instantiated. For example if we expect to be able to shoot more than 50 objects at the time, we need to create a larger array. If all the projectiles in the array are active, we simply wouldn't be able to shoot anymore as we need a non active one in order to do so.
Sunday, 20 March 2016
Loading Screen
This is another quick tutorial on loading screens.
A loading screen is the most common way to show he user that the game is running and it provides a visual representation of the loading process.
First, I create a canvas called LoadingCanvas, which is going to contain an Image, called Loading Screen. Then, I add two more components and I place them as children of the image: a slider and a text. (Fig 1).
The text simply says "Loading..." and the slider will be used to show the loading progress.
Then other canvas you see in Fig 1 contains a button which, when pressed, will just load the next scene.
In Fig 2 we can see what the loading screen looks like.
The image is stretched so as to cover the entire canvas, and the 2 UI child elements are anchored and positioned to the center. Also, the LoadingCanvas has an additional component called CanvasGroup. I use this so I can modify the alpha parameter to turn the whole canvas invisible.
To put the loading screen to use we need 2 scripts: one for the actual loading screen, which will simply pass values to the slider, the other one is called by the button, which will activate the loading screen and pass the float value to it to be handed to the slider.
The first script, called LoadingScreen, assigned to the LoadingScreen image:
Nothing special, after getting all my references, I declare 2 methods, one that assign a float value to the slider and the other one that simply shows the whole canvas by raising the alpha value of the canvas group to 1.
Now, the other script, called LoadScene. This script is assigned to the button and its purpose is to load the next scene. Obviously, this is just our case, the loading screen could be activated by any other object that is required to load a scene.
For this script we need to add the namespace UnityEngine.EventSystems. To add functionality to the button, I use the interface IPointerUpHandler, as you can see from the script above. This will require to override the method you see declared on line 10, which in our case will start the coroutine on line 17.
Also, we need the UnityEngine.SceneManagement so we can use the code for loading scenes as the old Application,Load(...) is now deprecated.
This coroutine accepts an integer value that represents the scene to load. Then, we assign the previously declared AsyncOperation parameter ao to the object obtained by the static method LoadSceneAsync(...) of the SceneManagement class.
At this point we can activate the loading screen, which was given as a public value to this script so we can drag it in directly from the inspector.
The while loop is where everything happens: we check the the ao, which is our async operation, has not finished, and for each cycle we get the progress value with ao.progress, which is passed to the slider that will move accordingly.
A loading screen is the most common way to show he user that the game is running and it provides a visual representation of the loading process.
First, I create a canvas called LoadingCanvas, which is going to contain an Image, called Loading Screen. Then, I add two more components and I place them as children of the image: a slider and a text. (Fig 1).
![]() |
| Fig 1 |
The text simply says "Loading..." and the slider will be used to show the loading progress.
Then other canvas you see in Fig 1 contains a button which, when pressed, will just load the next scene.
In Fig 2 we can see what the loading screen looks like.
![]() |
| Fig 2 |
To put the loading screen to use we need 2 scripts: one for the actual loading screen, which will simply pass values to the slider, the other one is called by the button, which will activate the loading screen and pass the float value to it to be handed to the slider.
The first script, called LoadingScreen, assigned to the LoadingScreen image:
1 2 3 4 5 6 7 8 9 10 11 12 13 14 15 16 17 18 19 20 21 22 23 24 | public class LoadingScreen : MonoBehaviour { Slider loadingSlider; CanvasGroup cg; // Use this for initialization void Start () { loadingSlider = GetComponentInChildren < Slider> (); cg = GetComponent<CanvasGroup> (); cg.alpha = 0; } public void AssignValue(float v) { loadingSlider.value = v; } public void Activate() { cg.alpha = 1; } } |
Nothing special, after getting all my references, I declare 2 methods, one that assign a float value to the slider and the other one that simply shows the whole canvas by raising the alpha value of the canvas group to 1.
Now, the other script, called LoadScene. This script is assigned to the button and its purpose is to load the next scene. Obviously, this is just our case, the loading screen could be activated by any other object that is required to load a scene.
1 2 3 4 5 6 7 8 9 10 11 12 13 14 15 16 17 18 19 20 21 22 23 24 25 26 27 28 29 30 31 32 | public class LoadScene : MonoBehaviour, IPointerUpHandler { public LoadingScreen loadingScreen; public int sceneToload; AsyncOperation ao = null; void IPointerUpHandler.OnPointerUp (PointerEventData eventData) { StartCoroutine (loadScene (sceneToload)); } IEnumerator loadScene(int s) { ao = SceneManager.LoadSceneAsync (s); loadingScreen.Activate (); while (!ao.isDone) { loadingScreen.AssignValue (ao.progress); yield return null; } } } |
For this script we need to add the namespace UnityEngine.EventSystems. To add functionality to the button, I use the interface IPointerUpHandler, as you can see from the script above. This will require to override the method you see declared on line 10, which in our case will start the coroutine on line 17.
Also, we need the UnityEngine.SceneManagement so we can use the code for loading scenes as the old Application,Load(...) is now deprecated.
This coroutine accepts an integer value that represents the scene to load. Then, we assign the previously declared AsyncOperation parameter ao to the object obtained by the static method LoadSceneAsync(...) of the SceneManagement class.
At this point we can activate the loading screen, which was given as a public value to this script so we can drag it in directly from the inspector.
The while loop is where everything happens: we check the the ao, which is our async operation, has not finished, and for each cycle we get the progress value with ao.progress, which is passed to the slider that will move accordingly.
Subscribe to:
Posts (Atom)